Tuesday, 17 December 2013
How to draw a cartoon owl- so simple
Post on how to draw a simple owl in a cartonish way. Hope you like it, comment bellow and follow my blog :) twitter = @LauRevolution.
Step By Step
 |
| Owl |
Labels:
art,
beautiful,
business,
cartoon,
draw,
dys,
easy,
how to draw,
how to draw an owl,
owl,
step by step,
story,
tips
Saturday, 14 December 2013
Christmas Cards with Leafs
Re-cycle the dry leaves of your garden, and make some christmas cards. This are simple and nice, you can give them to someone or for your own, great activity for kids. Comment any thoughts and follow my blog please :)
1. What You Need
2. Steps
1. Get the Card and with the pastels or paints, put any pattern you like
2. Put liquid glue over the part you want , to then cover it with the leafs
3. Get the dry leafs ( cracked and made smaller) and put them on top of the glue
4. Wait until dry, then you can write on it, or make further decorations on the cover.
RESULT :
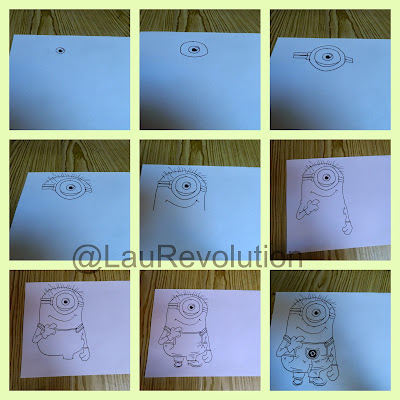
How to draw a minion ( carl)
This is a step by step, post on how to draw the minion Carl. You would need a pencil, black pen, and paper. If you wish to colour it later, use the colours that you wish. Comment bellow any thoughts :)
1. Step By Step

2. Result without colouring
3. Result with colouring
Friday, 6 December 2013
MY GSCE ART BOOK 2
I want to share my latest pieces of art, I did at classwork or homework. In my actual Yr10 GSCE ART COURSE. I might not be very good, but I put all my effort and feelings into it. Hope you like them. Comment bellow any thoughts :)
2.DRAWING AND PAINTING NATURAL FORMS. - Learning how to observe and draw, natural forms such as onions, peppers, tomatoes, and apples. All this are done at classwork.
1. Natural Forms.-timed drawings and continous drawings. ( pencil)
2. Natural Forms- atempt to draw close ups and lines. ( ink)
3. Onion Pencil- continous line
4. Onion Charcoal
5.Onion Acrylic - development of the charcoal onion , into different texture paints.
My GSCE ART BOOK 1
I want to share my latest pieces of art, I did at classwork or homework. In my actual Yr10 GSCE ART COURSE. I might not be very good, but I put all my effort and feelings into it. Hope you like them. Comment bellow any thoughts :)
1.DRAWINGS FOR A FURTHER PRINT- FIRST THERE IS A PHOTO ( IF AVAILABLE) AND THEN A DRAWING. First I did a plant drawing homework, then i choosed a fish drawing, and then at class i choose a plant one.
1.1 Plant drawing ( pencil)
1.2 Fish drawing ( pencil)
3.Plant and Apples ( pencil)-classwork
Monday, 2 December 2013
Clothes Tweezers message - easy
(COMMENT ANY IDEAS OR SUGGESTIONS BELOW)
This is an idea, for a cute present or to have fun. You will need, a small piece of paper : for the envelope and for the message. Then a blue pen, to write "You have a message". A wooden clothing tweezer. Red Pen and Black to decorate envelope. Choose what message you'll want to put. Glue to stick the envelope and message, and a small brush o tweezers to place it on the wooden tweezer.
First Step- Write on the tweezer, "You have a message" with a permanent blue or black. ( has better final result, but you can choose the colour you wish.)
Second Step- Make the little envelope. First stick with glue, the white paper into the tweezer. Wait until dry, or with a blow dryer. Then decorated as you wish, to make it look as an envelope. After cut, so it can be opened when you move up and down the tweezers.
Third Step- Write de message you want to use, ( I choosed " I love you") then place it carrefully on the back side. Stick it with glue. Wait until dry, and check you can freely see what it puts and how its placed.
RESULT:
Sunday, 1 December 2013
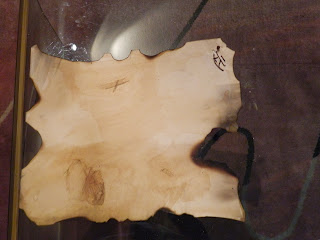
Coffee Paper, making an old effect. -easy
(COMMENT ANY IDEAS OR SUGGESTIONS BELOW)
A friend told me how could she, create a mysterious paper for a present and I had an idea. Its easy and simple. Try it at home!
First Step- adding the coffee into the paper. ( with the brush). You can apply it in any direction, any way you wish.
Second Step- light up some matches, and burn the sides. ( CAREFULLY.)To improve the result, You can scrap the paper, in some sections to add a more vintage result. Plus make some holes, and add a rope.
RESULT:
Subscribe to:
Posts (Atom)


